Porsche 944 Air Conditioning
When I got the car, the A/C didn't work. It didn't bother me much since I got in in the fall, so wasn't going to use it anyways, and by the time next summer rolled around, I just parked it for the hottest days and never even bothered to turn it on or try it. Call me lazy or apathetic…But I finally got around to taking a look at it. Ended up taking about 1 hour and 85 cents to fix. Here is the fix in case you have the same problem! Keep in my that this is for a 1984, so the 85.5 and up may differ.
Symptoms
The compressor would kick on, the blower would kick on, but no air at all would come out of the vents. It seemed like air was coming out by the passenger footwell, although not very cold. The coolant pressure was OK, so obviously no leaks, or it would be low after sitting around for 2 years.
Troubleshooting
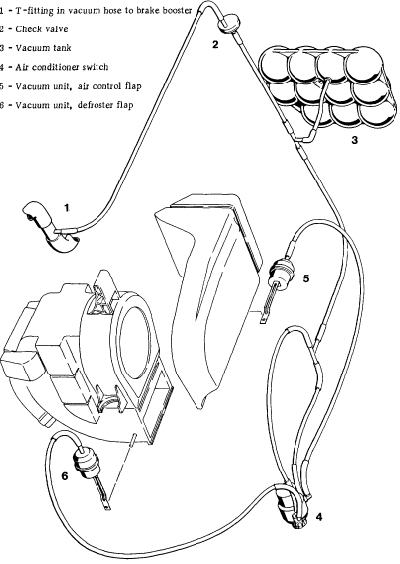
I started troubleshooting at the blower located in the passenger footwell. It was blowing air out of the intake. Squirrel cage fans aren't supposed to do that! My repair manual had absolutely nothing to say about the A/C duct work or blower operation. So I did some research on the net, and finally found an image of some of the parts involved in the A/C ductwork routing.
This picture is for reference, as the actual parts don't really look like that. I believe the vacuum units that open the passages are controlled by a separate electric valve, not connected to the actual A/C switch, evidenced by the fact that there is a part for it (944.573.165.00). Also, the vacuum tank is a cylindrical looking thing with a half dome end on one side, and a flat end on the other, located right next to the battery.
But the key is that there are two vacuum operated flaps that control the flow of A/C air. One opens up the passage from the blower into the heater ducting, and I believe the other closes off the heater blower motor so the cold air doesn't get blown out the car. So I deduced that my flaps were not opening/closing correctly.
Fixing
Well, like any good troubleshooter, I started looking at the easy stuff first. For me, this meant checking out the easy to get to stuff under the hood. I started at the vacuum tank, since that was easy to identify. Tracing back from that, I found a tee, one side went thru the firewall presumably to the electric vacuum valve, and the other went all the way over to the brake booster, where it connected to a vacuum check valve, and then to a small nipple on the brake booster vacuum inlet check valve.
Three things were apparent right away as I traced the lines.
- The line by the vacuum tank was cracked in two in two spots and had been repaired with packing tape. Nice!
- The check valve was cracked.
- The nipple on the brake booster had broken off and had been repaired with a short aluminum tube and some RTV silicone sealant, which had failed.
I fixed the cracked vacuum line by cutting off the bad part and replacing it with a piece of rubber vacuum line (the 85 cents) from the local auto parts store.
I was not able to find a local replacement for the cracked check valve, in fact NAPA could not even look it up. So, I put a few drop of oil in it, and blew some low pressure air through it on both sides to check the operation, and put it back into service as it was still working.
For the brake booster inlet, I removed it by carefully prying it out of the rubber grommet on the brake booster, and detaching it from the large vacuum line. I sanded it and the short aluminum tube down with 320 grit sandpaper to rough up the surface a bit, and broke out my favorite epoxy, quick set JB weld. I glued the aluminum tube back into the inlet port (the original had a plastic nipple, and apparently it is easy to bust off while messing with the oil dipstick). I tested the check valve operation, and put it back on, hooked up the vacuum lines, and viola! I had A/C coming out thru my vents. Just in time for summer driving season!

